Wednesday, September 26, 2018

Sensory Crafting and Creative Fun

    If you've followed us for any length of time, you know that we love to craft. I think I was born with it because I come from a long line of crafters. So when the weather changes and gets rainy and gross, we head inside and to be creative Thanks to Craft City, I usually have fun kits on hands for yucky days.

Sensory Crafting and Creative Fun


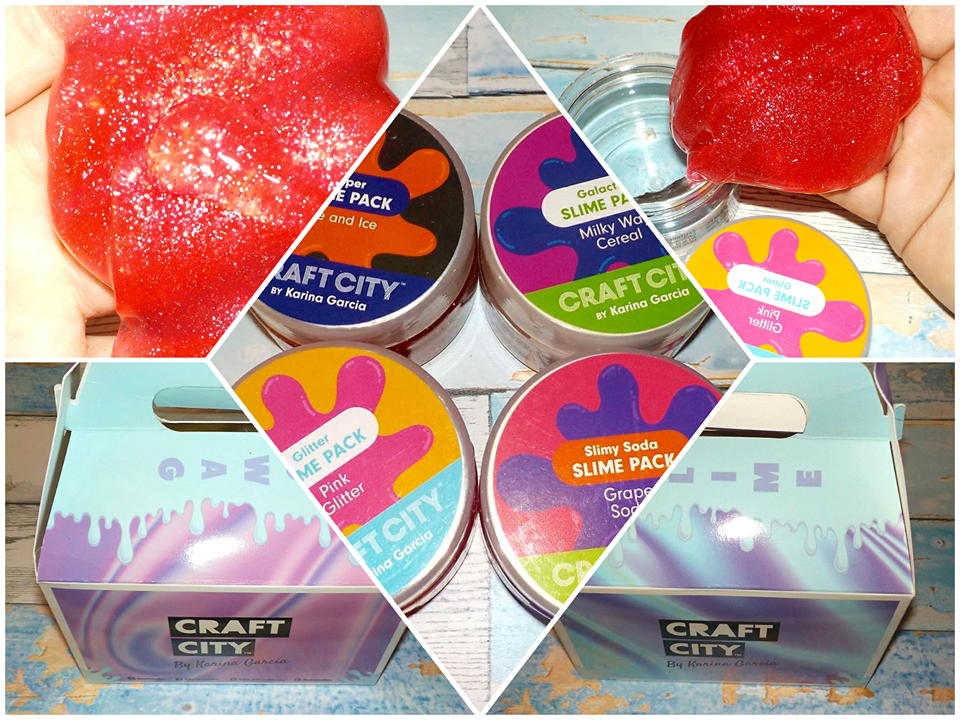
    Liam loves to make slime. It not only gives him something to do, but it promotes STEM learning. You know what else it does? It fulfills his need for sensory input. So making slime is a huge winner in our book. We happen to love the DIY Slime Kit from Craft City. It has everything you need to make opaque and crystal slime.


    This kit even comes with tablets to color the slime. There's glitter to make it sparkle too. Oh, and for added sensory fun, there's glow powder, and water gel too. The glow powder makes slime shine so bright! (You can even use it in dyed slime too!) The water gel makes the slime more gooey which is wonderful for kids that seek out more sensory input.


Squishy Art


    Squishies are all the rage. We've always had them on hand because they're a great way for Liam to keep his hands busy while doing his lessons. Well Craft City just upped the ante on squishies. Their DIY Squishy Art kit comes with everything you need to make you own custom squishies. There are three of them inside for your kids to decorate. The kit comes with puffy paint and chalk to color them. When you're done, you can add some faux sprinkles on top too.


    It's a great way to let your kids' creative juices flow. While also making themselves a sensory tool for school, homework time and more. We had a blast decorating our squishies. I did the cupcake, while Liam did the doughnut and surprise squishy too. Then he gifted it to his cousin, since he too loves toys to fidget with.


    The holidays are right around the corner. So why not gift your kids some of Craft City's kits. That way you know they'll have something to keep them occupied on snow and ice days. Also, it's a great way to spend quality time with them, and keep their devices out of their hands (even if it is only for an hour.)


Two Weeks into the Raw Diet

    So it's been a couple of weeks since my fur daughters have been enjoying their Stella & Chewy's Raw Diet. Let me tell you, they wait very impatiently for their dinner every night!

Two Weeks into the Raw Diet


    Since day one of trying the Venison Raw Diet, they have been in love. They know mom feeds them every evening at the same time, and they are in the kitchen at least 10 minutes before it's time. They know their yummy food is coming soon!


    We worked into this diet gradually, so as to not upset their digestive tract. While they have been eating one meal of the raw diet each evening, I still keep dry kibble down for them. That way they have a "snack" when they want it. My goal of this diet was to put weight on our German Shepherd. Our little mutt Josie was actually a bit overweight. So for her, I fed her a bit less of the raw diet. For Bayleigh, she is given the full amount, which is about 15 patties.

Results?


    Josie has thinned out some, which is perfect. Bayleigh on the other hand is filling out. I can see less of her ribs and I feel better knowing that she's working her way towards a healthier weight. I'm pleased with the ease of feeding them this diet. I'm also happy knowing that it's healthy for them, and I'm not feeding them fillers.

Is it time for my Stella & Chewy's yet?


    I also love that there's no gluten in the Stella & Chewy's Raw Diet. For Bay, gluten is fine. However, it's not so great for Josie. She has pretty severe skin allergies, and gluten seems to exacerbate them. I don't give her any gluten because if I do, she's itching and creating hot spots on her body. (Now if I could just get Liam to quit sneaking her bits of his sandwiches or cereals!) Josie seems to be less itchy, and her hot spots are healing up nicely. She'll be happy when she isn't getting her "medicine bath" every two days!


    I would definitely recommend this raw diet to anyone looking for a healthier food option for their dog. Whether you're looking to keep your canine companion at a healthy weight, put weight on them, or want to eliminate allergy inducing Gluten, this diet is perfect. After all, our pets are our children, and we should be just as picky about what we feed them as we are our human family.

   To get yours, head to Chewy.com


Monday, September 24, 2018

Don't Punish a Meltdown

    It's been awhile since I've written a real slice of life post. Well here it is. As it often happens with the posts of these kinds, the inspiration came from an unlikely source.

    How many times have you been told, "I would punish my child if he/she acted like that!" when someone witnessed one of your child's meltdowns?


    So we're rewatching Stranger Things seasons one and two on a loop lately. (I think Liam is ready for season three and tired of waiting, lol.) And something dawned on me. Wait......

SPOILERS AHEAD! PROCEED WITH CAUTION!!


     In season two, episode 4, when Elle and Hopper get into a fight about her breaking the rules, it was eerily reminiscent of watching an autism meltdown. Let me preface the rest of this as saying, NO I DON'T THINK ELEVEN IS AUTISTIC. Any fan of the show clearly knows, she has psionic abilities. And while our kids have their own "superpowers," thanks to Autism, we know they can't manipulate objects with their minds.

    However, if you watch this clip, you may see the similarities I picked up on. When our kids (or us for that matter,) have a meltdown as a result of an argument, there's a point at which you stop. You stop yelling, speaking, and probably breathing. Because WE know that if we don't, we can ignite the meltdown even further.


    Okay, so in the show, Elle isn't having a meltdown per say. She gets in trouble with Hop for disobeying his rules. This leads to an argument. However, because he too is angry, he keeps pressing her. Yelling. Screaming. Punishing her by taking away the things she loves. Now, I'm not at all saying kids shouldn't be punished when they misbehave or break rules. What I am saying is that we must learn to step back.

    We know that Hopper lost his daughter at a young age. So he hasn't been a daddy for a few years. Now he's raising a tween. A powerful tween, that is full of hormones, emotions, rage, and heartbreak, from a life lived in a lab. So not only is Hop out of date on parenting, but he's never had to father a child of this age, or with this background. 


    Okay, so let's think of the people that tell us our kids should be punished when having a meltdown. They are Hops. (Maybe not as sweet, because let's face it, some people suck.) What I mean is, they may not be parents, or aren't parents to special kids. So they don't realize that we can't yell, scream, and punish our kids when they are having a meltdown.

    We all know that as our kids get older, and they do make mistakes, we need to step in. However, when an argument progresses into a meltdown, we must step back. In that moment, the time for reprimand is lost. Now it becomes a spiral, that we must guide our children through.

    Once they make it out the other side of that meltdown, they're tired, we're tired. Probably still angry or at the very least upset, too. Which means, that now isn't the time either. This is where "we must choose our battles," stands out. Depending on the infraction that led to the argument, and the subsequent meltdown, there may still need to be a punishment. However, that can come later.

    When everyone involved has calmed down, and is thinking rationally, is when we should sit down and talk. Explain to our autie what they did wrong. Why we were so upset. And then give the punishment. However, be clear that you aren't punishing for the meltdown, but rather the mistake the child made which led to the argument and spiraled into that meltdown. 


    So my whole comparison for this post is this: When people see our kids having a meltdown. They're screaming, crying, maybe throwing things, breaking things, (like Eleven in the clip above,) or becoming self injurious, they think our kids are being brats. Those people would react much like Hopper. However, they don't realize, that in that moment, our children are out of control. But WE DO. And that's all that matters. So choose your battles, and bide your time. You got this. (And be thankful our kids don't have psionic abilities! Can you imagine that? We would never have windows, doors, and probably walls in our homes.)

Thursday, September 20, 2018

Let's Make a Fountain

Okay, let me preface this post so you all don't think we're slobs. We are currently in the process of moving over three hundred and fifty miles away. Therefore, my house looks like a tenement camp! With that being said, I want to share with you just how easy it is to make your own fountain.


Let's Make a Fountain

    I am a water baby, as is my son. Every spring when we're out shopping we're both drawn to the outdoor and indoor fountains. However, have you seen how much they cost??? I refuse to pay that much especially since it's more fun and waaaayyyy cheaper to create your own. I made mine for under twenty-five bucks, and depending on how you create yours, you can too.


The Pump

    The first and main thing you need to get started is a submersible pump. After all, it won't be a fountain if you don't have something to pull in the water, and push it back out. I got this one from Amazon for under twenty dollars. It works wonderfully! You can adjust the water flow to control your fountain, and it easily comes apart so you can keep it clean. This was huge for me because my cat likes to drink out of my fountains!

    This pump is super quiet which is a must. You want to hear your water running, not hear the pump motor.  (YuanHua even has a smaller version if you want to make a smaller scale water feature, or a bigger one for larger needs.)


Tubing

    Depending on what size pump you choose, you will need tubing. I found mine on Amazon, but you can grab it at your local hardware store too. Buy extra so you can replace it. With time, it will become yucky inside, and if you have pets drinking from your fountain, you will want that tube to be clean.

The Bowl or Pot  

    You're going to need something to contain all of your water. I chose an elongated planter, but you could use a flower pot, wash basin, or anything really. It just needs to be deep enough that the water inside will completely cover your pump.
  
    You will also need something for your water to pour over. In the past I have used rocks and created a mini waterfall. This is effective in a turtle habitat or for pet frogs too! This time however, I wanted to match our nautical theme. So I chose a bunch of whelk shells that my papa and babcia collected for us from Assateague Island. In the largest one, I drilled a hole to accommodate the tubing. Then all I did was put my pump inside my planter, and arrange my shells around it.


    When I first created it, I had the water pooling into the shells, and pouring into lower ones. However, I couldn't really see the water unless I was standing over it. I also couldn't hear it and that defeated the relaxing purpose of my new fountain. So I rearranged the shells, and just have the water pouring from the biggest one. Now I can hear the trickle and actually see the water falling from a room away. 

My Total

    For my seashell fountain I actually used the smaller pump from YuanHua because I knew my cat was going to drink from it. (The smaller pump is safer for pets current wise.) So that pump cost 10.99. I paid about five dollars for my tubing, and my planter was six dollars. My total was under 25 dollars.


Holiday Gift Guide


Welcome to our Holiday Gift Guide!


Here you will find gift ideas we love the most. Whether you're shopping for family or friends, we have something for everyone. 

Check it out!


(Please DO NOT add your own links)


To be featured contact me at alegionforliam@gmail.com

Sunday, September 16, 2018

Turkey Cheeseburger Pet Bites

    I've been on a baking spree lately. It's been chilly and damp here in NEPA, so that's when I heat up my oven. My girls actually love this weather, because they know that treats will be coming their way. This week I created a new recipe. It's Turkey Cheeseburger Pet Bites, and my girls are head over heels for these goodies.


Turkey Cheeseburger Pet Bites


    I had fun creating this recipe. First of all, it used up some leftovers, and I love being able to "upcycle" foods because there's no excuse for waste. Secondly, these differ from the traditional fruit or veggie treats I make my dogs. Lastly, I had all of the ingredients on hand, which is super convenient. As I said, the main ingredient was leftovers I had in the fridge. Also, as a side note. When you're cooking meat for your family, save those grease drippings! I pour mine into freezer safe bowls, let them cool, and pop in my freezer. When it comes time to bake, I break some off, and then warm it up in the microwave. It's good for your dogs coat and skin, and makes for wonderful flavor. Remember, moderation is healthy, so you don't need a lot of it. (I save all of my red meat grease in a bowl, and all of my white meat grease in another.)


    With only six ingredients, these treats are simple to make, and easy on the food budget too. So let's get started with what you'll need.


Ingredients:


  • 3 cooked hamburgers (I ground mine up in a food processor.)
  • 2 jars of Turkey baby food (the small 4 ounce jars.)
  • 1/3 cup of coconut oil
  • 1/4 cup of grease drippings
  • 1 cup of flour
  • 1 cup of shredded cheese

    Preheat your oven to 400°. In a bowl combine ground hamburgers, baby good, oil and grease. Next, mix in shredded cheese. Add flour into bowl slowly, and mix well. Place mixture on cookie sheet by the rounded teaspoonful. Bake for twelve minutes. See? Easy peasy!

Ground up cheeseburgers make a tasty cookie base for pets.


    This recipe yields about 32 cookies. It will keep fresh in the fridge for about a week. So freeze some, and just defrost as they will be eaten. Josie and Bayleigh are head over paws for these cookies. We'd love to know what your fur baby thinks of them.


Saturday, September 15, 2018

Keep Food Fresh and the Planet Happy

    Back to school season means many parents are back to packing lunches. It also means that sandwich and snack bags are being used. But these disposable bags really aren't good for our planet. What if I told you that I have a better option? One that will save money and Mother Earth!


Keep it Fresh and Our Planet Safe


    Criss Elite has fantastic Silicone Food Storage Bags that can be used again and again. You won't have to keep buying those disposable bags, so in the long run, you're going to be saving more money. That also means that the disposable bags won't end up in our landfills. By using the Silicone Storage Bags, you'll be reducing your carbon footprint. That's something all of us should be doing.


    These bags are heavy duty and will withstand going to and from school and work each day. They are leak proof and have a sturdy zipping lock on the top. It will keep contents from leaking into lunchboxes or briefcases. You can even put drinks in these bags! Milk, juice, even smoothies or soups will travel safely in the Silicone Food Storage Bags. And I'm not just saying that. I know because I have thoroughly tested them. Check out my video!


Food Safe Silicone


    These FDA Approved, Silicone Food Storage Bags are designed to keep you and the contents safe. They're made from food grade silicone and are BPA, PVC, BPF, and Phthalate Free. The bags are also non allergenic, non reactive, and non toxic. Which means they're safe for your entire family.


Refrigerate, Freeze, and Reheat


    You can use the Criss Elite Silicone Food Storage Bags for more than just keeping your foods fresh, and packing lunches. These bags can be put in the refrigerator, and stored in the freezer too. (Want to preserve your garden veggies without canning? Well, now you can freeze them in these Silicone Food Storage Bags!)

    Food can even be reheated in the bags. You can microwave and boil them too. When you're done, simply wash in the dishwasher, or by hand. Silicone withstands high and low temps. It's such a versatile material!


What We Think


    I love my set of Silicone Food Storage Bags from Criss Elite. (As a matter of fact, I have more sets on my Amazon list!) They're convenient and easy to use. I also feel good knowing that I am doing my part in preserving our planet for generations to come. 


Thursday, September 13, 2018

Raw Feeding Thirty Day Challenge

    Chewy.com reached out to me and asked if I'd like to take part in their Raw Feeding Thirty Day Challenge. Since no matter what I do, I can't keep weight on Bayleigh, I was ecstatic to take part.


Raw Feeding Thirty Day Challenge


    As I said, Bayleigh is a very active girl. She always has been. Because of that, she has never put weight on very well. You can almost always see all of her ribs. We hoped that when she was fixed, she would hold weight better. However that just isn't the case. So we've been exploring her diet to see what we could do to add some weight, without making her unhealthy. When Chewy.com asked if we'd like to take part in the Raw Diet 30 Day Challenge, from Stella & Chewy's were excited to try it.

First Thoughts


    When the thirty day order came in, my girl's were both all over the box. I'd like to say that they can tell it's a Chewy box just by looking at it, but let's be honest, their noses for news can smell those boxes coming! Inside was three large bags of Stella & Chewy's Freeze Dried Dinner Patties Raw Dog Food. We chose venison since both of my fur girls love when their uncles bring them deer meat.


    The patties are the size of a small hamburger. Don't let the "dried" part of their name fool you. These patties are compressed and dried meat, but they are still a bit soft. You can easily break them up. When you're feeding your dog, you can simply break up the patties, and serve them that way. That is if, your dog drinks while he or she eats. (Make sure to have a bowl full of water for them if feeding this way.) If they don't normally drink while eating, then you can soak the patties to soften them. You use a quarter cup of water per every two patties.

    I could immediately smell venison when I opened the bag, and my girls were right there waiting. They couldn't wait to try their Stella & Chewy's Raw Food. I did soften both of my girls patties. Bay will drink while she eats, but Josie doesn't always drink, so it was easier this way.

Weaning


    Since you can't just switch your dog's food, we started by supplementing their dry kibble. Remember, when switching any of your pets diets, you must do it slowly. Otherwise they will get upset tummies, and most likely diarrhea to boot! I fed Josie two and a half patties. Bayleigh is much larger, so I gave her ten patties. (When she is completely on this diet she will require at least fifteen and half patties per day.)


    They cleaned their bowls in a matter of seconds. I couldn't believe it. Especially since Josie is a VERY picky eater when it comes to dog foods. She licked her bowl so clean, you couldn't tell there was ever any food in it! So now we wait. I'll check bag in a couple of weeks and let you know how it's going. I'm excited to see if Bayleigh fills out a bit more.

Join us!


    If you'd like to take the 30 day raw food challenge, then head to Chewy.com. Grab your pet's preferred flavor and get started. I'd love to hear what you and your fur babies think!


Wednesday, September 12, 2018

Keep Your Seats Clean and Dry in All Seasons

    We have two fur daughters (and one furry granddaughter.) Our youngest daughter just happens to be the biggest of all, and the one that loves water and mud. To say our Jeep seats look terrible is an understatement. I personally hate cleaning them, so I need a way to keep them clean and dry in all seasons. Chewy.com was there to help!


Keep Your Seats Clean and Dry in All Seasons

    I do all of our pet shopping at Chewy.com. They have everything we need in one place, and their prices and customer service can't be beat. So when I decided I was tired of detailing our Jeep every week, I went to Chewy.com. I discovered the car seat covers from Frisco, and knew they were for us.


    First of all, they're made of heavy duty Oxford Polyester. Which means they will stand up to my German Shepherd, as well as the mud, dirt, and water she will get on them. This material also makes them resistant to water, spills, and color bleeding, so my Jeep seats are safe from everything Bayleigh brings their way. Since they are easy to wipe clean, and can be machine washed, I can easily keep them clean. 

I just cleaned my seats last week.... I had to clean them again before I put on my Frisco Car Seat Cover

Seat Cover or Hammock

    Frisco has these seat covers in a traditional Bench Seat Cover, or a Hammock Cover. I chose the bench style since I also have Liam that sits in the back with the dogs. This way my son and my fur daughters can't ruin my back car seat. The cover is kid and dog proof! ;) 


    The Frisco Hammock Seat Cover will not only protect your back seat, but it also keeps dirt, debris, water, mud and more from your floors. Oh, and it protects the back of your front seats as well. 


Accommodates Human Seat Belts and Pet Restraints

    I love our Frisco Car Seat Cover. It was super easy to install, which means it will be easy to remove and clean, and then put back in the Jeep. You can also access your seat belts with the cover in place. So whether you have a human sitting in the back with your fur baby, or you use a pet restraint for car safety, you can access the buckles so your babies are safe!


Tuesday, September 11, 2018

Sensory Input for Back to School

A few days ago I got an email from the amazing folks behind Craft City. They wanted to know if Liam would like a Slime Swag Set for back to school. Of course that answer was a resounding yes!


Sensory Input Back to School Style


Now I know all too well how much fun it is to make slime. It’s one of mine and Liam’s favorite ways to spend time together. However, we don’t always have that time, especially during the school year. With that being said, there’s still a need to have slime because it gives Liam wonderful sensory input, and also keeps his hands busy during lessons. Busy hands means he focuses more on me instead of looking around the room and trying to find something to occupy his empty hands.


So when Karina and her team from Craft City asked if we wanted some premade slime, our answer was yes! They did not disappoint! A mere two days later a bunch of slimy fun arrived on our doorstep.


Soda Slime


Let me tell you, this slime smells absolutely fantastic! When my son opened it, I could smell it sitting across the room from the him. He got Orange and Grape soda. Craft City also has Cherry Cola scented and Lemon Lime Soda as well. Your kids are sure to love this four pack of premade slime.

Super Slime


This may very well being one of Liam’s favorite types of slime. He loves the colors and glitter. His favorite is Fire and Ice. It’s an orange slime with gold glitter (two of his faves,) and it even has plastic chunks of “ice” inside. He loves manipulating this slime to expose the ice and pick them out. The four pack also comes with Mood Ring slime which changes colors with heat.  Metallic slime, and Glow in the Dark Rainbow too.


Galactic Slime


Inspired by space, this four pack of Craft City premade slime is out of this world! It comes with Blackberry Blast Off, Martian-mallow, Milky Way Cereal, and Green Apple Goo. The green apple smells exactly like a hard candy. The Milky Way Cereal looks and smells just like a fruity cereal. Plus it has foam balls for even more sensory input.


Glitter Slime


If glitter is your thing then you’re going to love the Craft City Glitter Slime four pack. It comes with glittery fun in blue, gold, rainbow and pink.


More Fun From Craft City


These are just a few of the fun activities and sensory items from Craft City. You can make slime, lip gloss, and more. There are even kits to color your own squishies too! Karina sent Liam two keychain squishies, and two of those balls that you squeeze and parts of it pop out. He hasn’t put them down since they came!


Sunday, September 9, 2018

One Skillet Cheeseburger Mac

I’m getting tired of the same old dinners. This week I was thawing two pounds of burger, and wondering what to do with it. This is what I came up with, and it was a hit with my entire family. (Sans Liam because he has too many food aversions.)


One Skillet Cheeseburger Mac

This ten ingredient recipe is easy and can be made right in one skillet. (That’s huge for me because I personally loathe washing dishes.) I actually had all of the ingredients on hand, and you probably do as well. So are you ready to get started?


(This recipe makes enough for about four people. I doubled it when I made it, and it fed six adults with three meals worth of leftovers.)


Ingredients:


  • 1 pound of ground beef

  • 8 ounces of elbow macaroni

  • 2 cups of shredded cheese (I used Sharp)

  • 1 ½ cups of broth (Beef or chicken will work. I used chicken and it was fantastic!)

  • 1 ½ cups of milk

  • 3 tbsp Ketchup

  • 2 tsp Montreal Steak Seasoning

  • 1 tsp Yellow Mustard

  • ¼ tsp Garlic Powder

  • ¼ tsp Onion Powder


In large pot or skillet, brown your beef. If you’re using 90/10 or 80/20,
leave the grease drippings in the pot. Otherwise, drain it because you don’t
want an over abundance of grease. Next stir in the broth, milk, ketchup,
mustard, and seasonings. Then add your elbow mac. Stir well, and bring
to a boil. Reduce the heat, and simmer until the mac is cooked. Lastly, add
in the shredded cheese and mix well. Let stand to thicken a few minutes, and serve.

I didn't get a lot of good pictures, because my family woofed this dinner down too fast!


That’s all there is to it. This cheesy goodness is packed full of flavor.
My family already asked me when I plan to make it again. Then my sister
asked for the recipe, for herself and her hubby. So I know it’s a winner!
Try it and let me know what you think!

Puffy Pumpkin Cookies

Since we’re on a pumpkin spice kick, I want to share my other new recipe with you all. Again, I designed this recipe for my fur daughters, but it’s human friendly (and tasty) as well. With only 6 ingredients, it’s super easy too! So let’s get baking!


Puffy Pumpkin Cookies


I love creating new recipes for my entire family. One of my goals is to mak
them healthy, taste good, and use very little ingredients so they are easy to make
This recipe is no exception. You only need 6 ingredients and I’m willing to bet
you have most of them, if not all of them in your house. Like the other recipe,
this one calls for pureed pumpkin. I usually have this on hand for baking, but
make sure it’s just 100% pumpkin. (It’s better that way!) I’m ready to get started,
so let’s go!


Here’s What You’ll Need:


  • ¾ cup Kind Granola (you can use any brand, but we are partial to Kind)
  • ¾ cup Pureed Pumpkin
  • ⅓ cup Brown Sugar
  • ¼ cup Coconut or Olive Oil (This is amazing for skin and heart health too!
  • 1 ½ cups of Flour


Preheat your oven to 400°. Mix the first five ingredients well. Then slowly mix in flour.
Once you have it all mixed well, grease your cookie sheet. Drop your dough by rounded
teaspoons onto the pan. Bake for 10-12 minutes. Let cool.

That’s all there is to it! Using teaspoon sized cookies, this recipe will yield about three dozen
tasty treats. Like I said, humans and fur babies will love them. But remember, because these
are all natural, there are no preservatives. Therefore you should store them in your fridge.
If you want to keep them more than a week, then freeze them. Just thaw when you’re ready to enjoy.